Thursday, October 24, 2013

Alaska: Breaching Humbpack Whales


Before my most recent trip to Alaska, I had been out on two previous all-day whale watching tours.  Both times we saw a few whales.  But we never saw more than a few of them swimming on the surface and I never managed to get any images I felt good about showing to anyone else. I had never even managed to get a decent water-dripping tail shot, or a photo of a whale exhaling through its blowhole.  In short, whale photography has been a complete bust for me until now.  It has always been my dream to see a breaching whale, and if it ever actually happened, I hoped to be quick enough to get a decent photo.   I always figured it would probably be a 'one-and-done' opportunity that would likely never repeat itself.

This trip out of Seward Alaska started out like the other two.  After a while we found some whales but I was not getting opportunities that were any better than I had seen in the past.  It seemed likely that this day would bring more of the same.  We did see some puffins and other birds but found it very challenging to photograph them in flight.  One person likened it to attempting to photograph a bullet, and it's not as much an exaggeration as you'd think until the first time you actually try it.  It's would be difficult enough if you were standing on stable ground, but trying to do it from a boat bobbing up and down in the water adds that much more difficulty to the task.

We also saw sea lions on rocks near an island, but nothing very exciting when one thinks of an image worth showing anyone else.

At one point our boat captain got a call on the radio and told us we were leaving.  He didn't tell us where we were going or what had been seen, but told us if nothing changed this was going to be worth it.

After about a 15 minute ride we came upon some whales and they were continuously beaching.   I don't know how many there were but there must have been a lot because everywhere we looked, they were breaching.  Sometimes they were breaching more than one at a time and we had to choose which direction to point our lenses. 

It happens very quickly and you need capable equipment in order to point in the right direction and focus in time to get a good shot before the whale falls back into the water with a huge splash.  To add to the challenge, most of the time our 35-foot boat was bobbing up and down in the seas.  It would have been easily to slip and drop my gear if I had not been extremely careful. 

Our group of six photographed the humpback whales continuously for what seemed like close to an hour.  Looking at the time stamp on my images, I later determined that I had been photographing breaching whales for 48 minutes straight.  At one point during this time, I turned to my cousin, David  and told him I was seriously wondering if we were about to wake up and learn that this was all just a dream.  It certainly seemed like it.  I would have never believed this could happen if I had not actually experienced it myself.   

I have already written a lot more than I had planned as I attempted to explain what we witnessed that day.  So I'll stop here and get to some photos.  I photographed 47 separate breaches, and most were multiple image bursts that look like a video when I look at them in secession.  Most were pretty sharp or at least usable, so I was able to choose a few favorites to post.  If you have have half as much fun viewing these as I did shooting them I will have accomplished my task.  This day was nothing short of  indescribable.  It is a day I will never forget.

You can see more images from this trip on my website at www.timrucci.com


Saturday, October 19, 2013

Alaska: Bald Eagle in Flight


On my recent trip to Alaska, I finally had a decent opportunity to photograph a bald eagle in flight. This was my 4th trip to Alaska but ironically I had never had this  opportunity before.  This is mainly because I had not spent much time in the coastal areas of Alaska.   As we all know, if you want to see a specific bird or other animal, the best plan is traveling to where its food supply is.  Since eagles mainly feed on fish, your best chances are in coastal areas. 

On this occasion I was in Homer Alaska, which bills itself as the halibut capital of the world.   One evening I saw an eagle up on a perch in a light falling drizzle in less than perfect light.  The daylight was also waning as I waited nearly an hour to see if the eagle would leave its perch.  Every few minutes I would take a test shot to meter the light and ensure that I would nail the exposure in the event the eagle would take flight and gave me the opportunity that so far had evaded me.   I was about ready to give up when the eagle started to move and raise some optimism that it would soon fly.

I was shooting in manual exposure mode to ensure that the camera would not try to adjust the exposure as the color of the background changed.  Having the camera automatically adjust the exposure when using aperture priority or shutter priority modes will result in incorrect exposures and lost shots if the color of the background changes.  As long as the general level of light is not getting brighter or darker, manual exposure is the best approach to this type situation.  While I waited, the correct exposure ranged from +1EV to about +1.67 or +2EV by the time the eagle flew.  To get the correct exposure I had to overexpose the shots about 2-stops compared to what the camera metering system thought was the correct exposure.  The white background filling at least 3/4 of the frame compared to the dark colored bird was fooling the metering system.  So the photographer must trust the histogram if he intends to get the true, correct exposure.

For this entire series of images, the settings were 1/1600 @f4, iso 1600, (+2EV) with Canon 1DX camera and 500L f4 IS lens.

The eagle finally launched itself and I was firing immediately from the start.  I seldom if ever shoot long bursts, but this was an occasion where such action was warranted.  I knew it might be difficult to keep my focus sensor pattern trained on the eagle as it flew, so I used settings that caused the camera to delay searching for the subject in the event the focus sensors were not on the bird the entire time as I attempted to track its flight.

I ended up firing a burst of 37 consecutive shots in a period of just over 3 seconds.  I managed to track the eagle relatively well through the flight and only lost focus as the bird banked and flew over my head.  Upon reviewing the images on the rear LCD of my Canon 1DX, I found that about 32 of the 37 shots were tack sharp, and 2 or 3 more were acceptably sharp.  The 2 shots that were unusable were the last 2 in the sequence where I no longer had the focus sensor pattern on the bird as it flew past me.  (in other words, the 2 unusable shots were my fault, not the camera's).

With birds in flight, it's always good to have lots of in-focus shots so one can pick out the most flattering images with the most appealing wing positions.   I chose several from this sequence and posted them below.  

You can see more images from this trip on my website here:
http://www.pbase.com/tim32225/alaska_2013

Please feel free to click on the link above and take a look.


Friday, January 11, 2013

Great Blue Heron - Nest Building

It's been a few months since I've posted anything here, but lately I have gathered some new material so finally I have some images to share.  I recently treated myself to a new camera, and the images in this post were gathered while trying it out for the first time at a couple of my favorite venues for bird photography.  

Male heron handing a twig to the female
1/3200 @f10, iso 3200, 700mm

The camera is a Canon 1Dx and I so far am very pleased with it. I was shooting a Canon 1D Mark 4 prior to this and now that camera will serve as a very capable backup.  The 1Dx is absolutely the fastest, most responsive camera I have ever held in my hands.  The speed and accuracy of focus acquisition is simply amazing, even compared to the Mark 4.  I am confident that this camera will serve me well on my coming trip to Kenya.  
 
1DX_0687 Male heron gatering sticks
1/320 @f7.1, iso 800, 700mm
 
 
Last week I tried out the camera at Merritt Island National Wildlife Refuge, and Viera Wetlands, about 30 miles further south. There was not much bird activity at Merritt Island the first day but a trip down the road to Viera proved to be very productive. There were several pairs of great blue herons building nests, and as you have probably already realized, they are the subject of this post.                            
 
1Dx_0669  Male flying back to the nest
1/640 @f7.1, iso800, 700mm 
 
 
 I had observed great blue herons nest building on prior occasions, and discovered that their behavior is very predicatable. The male repeatedly flies to and from the nest, gathering twigs and handing them off to the female. The female then places each twig exactly where she wants it in the nest. This process repeats itself over and over so it is not too difficult to get in a good position to photograph it.
 
1Dx_0733 Male heron flying back to the nest
1/5000 @f10, iso 1600, 700mm
 
About every 5 minutes or so, the male would leave the nest and fly off to find aother twig.   It would only take about a minute for him to find one and then fly back to the nest. 
 
1Dx_0672  Male heron landing in the nest
1/1250 @f7.1, iso 800, 700mm
 
1Dx_ 0680   Male heron preparing to hand the twig to the female
1/1250 @f7.1, iso 800, 700mm
 
Typically in just a few minutes, the male is flying away again to gather more nesting material. 
 
1Dx_0725  Male heron headed out to find nesting material
1/4000 @f10, iso 1600, 700mm


Friday, June 29, 2012

Whitewater ! Ohiopyle Falls, PA

We recently returned from a two week vacation that included a several days in a golf resort near Morgantown, West Virgina.  While we were there, my wife took our nephew white water rafting one day, but I opted to sit out and just try to get a few photos of them as they put in and started off in their rafts.   This was across the border in Pennsylvania, on the Youghiogheny River.  There is a park along the river adjacent to where the rafters set in, and just upstream is the 20 foot high Ohiopyle Falls.

Ohiopyle Falls

While I was on a viewing platform at the falls, a woman I spoke to there told me that three of her friends would be going over the falls in kayaks in the next few minutes.  I turned my attention to the falls, and watched and photographed all three of them individually as they paddled through the rapids and then went over the falls.  It was an interesting spectacle to watch.   I shot sequences of about 25 images of each kayaker, and you can see a few of them below as each paddler went over the falls.

#5661 - 1/3200 @f7.1, iso 800


#5662 - 1/3200 @f7.1, iso 800


#5663 - 1/3200 @f7.1, iso 800


#5664 - 1/3200 @f7.1, iso 800


#5771 - 1/3200 @f7.1, iso 800

#5702 - 1/3200 @f7/1, iso 800
#5703 - 1/3200 @f7.1, iso 800

#5624 - 1/3200 @f7.1, iso 800

#5625 - 1/3200 @f7.1, iso 800
#5628 - 1/3200 @f7.1, iso 800

Friday, May 25, 2012

Photographing Roseate Spoonbills in Flight

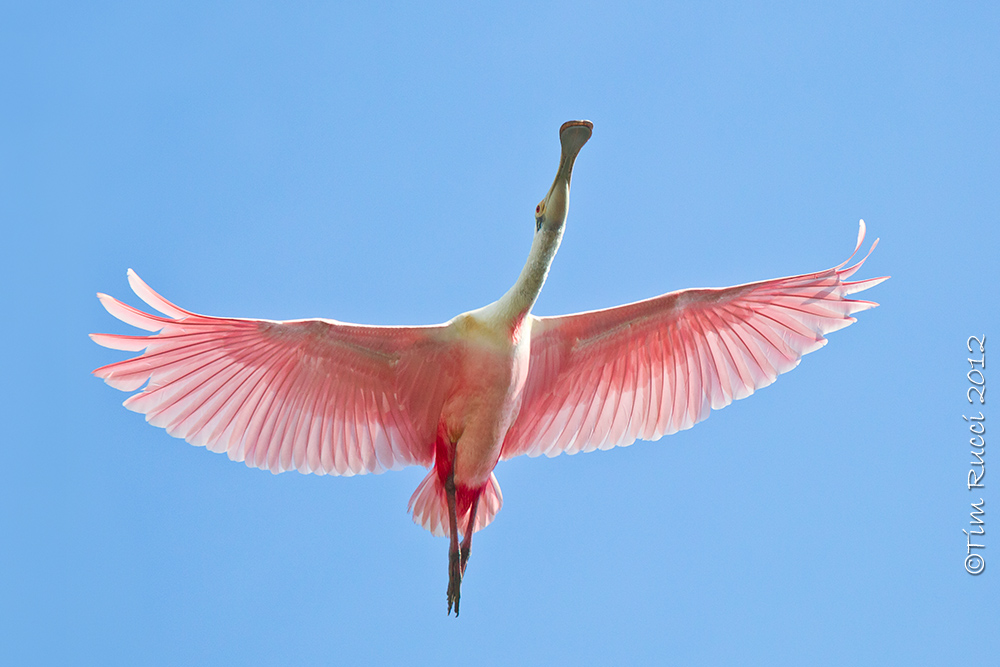
The roseate spoonbill is one of my favorite birds to photograph.  It's fun to watch them fly and their pink color against a bright blue sky makes in interesting photograph.  I had the occasion to see a few of them the last couple weeks and managed to get a few decent flight shots. 


#M4_03086 1/2500 @f5.6, iso 640, 400mm, distance = 74.7 ft
Canon 1D Mark 4 & 100-400L IS lens


Typically I try to keep my shutter at 1/2000 second of higher for flight shots in order to eliminate any motion blur.  If I manage to keep tracking the moving bird effectively, this gives me a chance to get a decent photo. 


#M4_03087 1/2500 @f5.6, iso 640, 285mm, distance = 59.3 ft
Canon 1D Mark 4 & 100-400L IS lens


The photo above was the next image in the same series as the bird flew overhead.  The wing position in this one is what I like.  The image always seems more appealing to me with the wings in the full spread position.  The curled primary feathers at the tip of the wings are an added plus.


#M4_03058 1/2500 @f5.6, iso 640, 310mm, distance = 59.3 ft.
Canon 1D Mark 4 & 100-400L IS lens


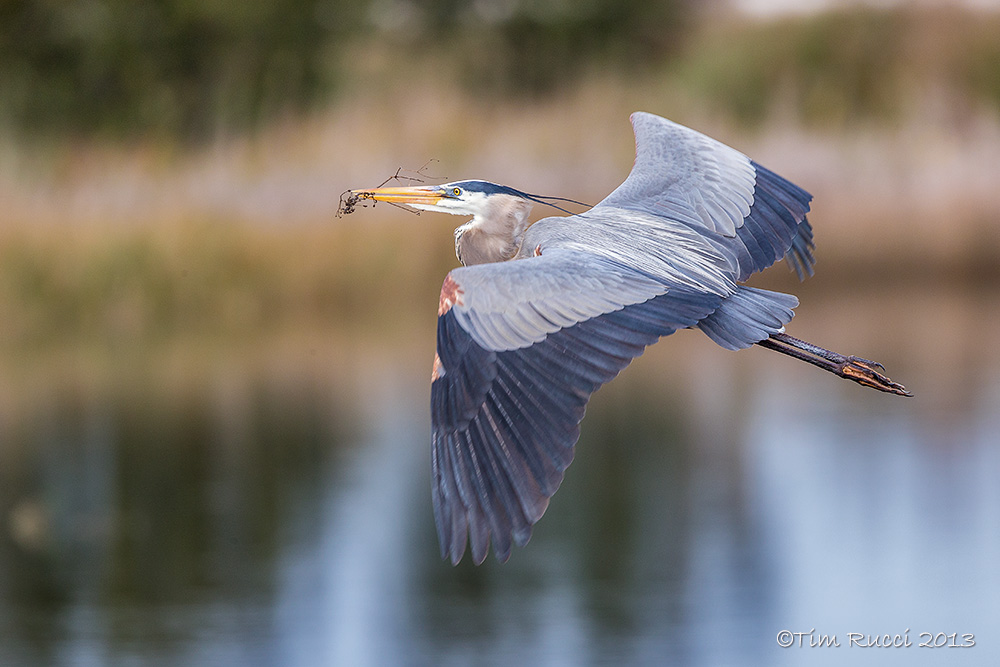
One thing that makes it challenging to get an attractive photo of a bird in flight, is the fact that usually the underside of the wings is shadowed and therefore dark.  The exception is late in the early morning or late evening when the sun is low, as sometimes the sun lights up the underside of the wing. That is the case only if the sun is behind you and the bird is flying toward the light.  But even then, the chances of the underside of the wings being properly lit are not very high.  For this reason, I almost always shoot with a flash and a 'better beamer' flash extender, which increases the range of the flash by about 2.5 times.  In the image directly above, even though I used flash, the sunlight hitting the bird from above was still much brighter than the flash.

You can see how just a little different angle of light makes for a better photo in the example below.  With the bird about 25 feet closer and banking slightly more, I am able to get more light under the wings from my flash.


#M4_03178 1/2500 @f6.3, iso 400, 210mm, distance = 35.4 ft.
Canon 1D Mark 4 & 100-400L IS lens


#M4_04948 1/2500 @f5.0, iso 400, 300mm, distance = 83.6 ft.
Canon 1D Mark 4 & 300L f2.8 IS lens


I almost always shoot in full manual exposure mode because it offers several advantages over the programed auto exposure modes.  First, in manual mode the camera does not alter the exposure according to the brightness of the scene.  Allowing the camera to control the exposure us usually a deal breaker for birds in flight, because the brightness of the background changes dramatically if the bird suddenly flies away from the blue sky background and in front of a darker background of water or foliage.  In auto exposure modes such as aperture priority or shutter priority, this would result in an overexposure of about 2 stops which means your image goes straight to the recycle bin.

Second, in the Canon system the external flash automatically fires at higher power when the camera is in manual exposure mode.  (Flash acts only as fill in Av and Tv modes, resulting in a lower power flash).  Using the better beamer and full power flash gives me over double the flash range.  I can easily throw light from the flash on a bird 100 feet away using this method.  The better beamer uses a fresnel lens and works by concentrating the light into a narrow beam, thereby increasing the amount of light that hits the target.


#M4_03063 1/2500 @f5.6, iso 640, 260mm, distanced = 48.8 ft.
Canon 1D Mark 4 & 100-400L IS lens


The images directly above and below are of younger spoonbills.  The colors are more pale, and darken as the bird grows older. 


#M4_04871 1/2000 @ f5.6, iso 400, 170mm, distance = 35.4 ft.
Canon 1D Mark 4 & 100-400L IS lens


For birds in flight, I typically use the center focus point, with the surrounding 6 focus points also activated in A1-Servo (focus tracking) mode.  This gives me 7 active focus points in the middle of the frame to track the moving bird.  Once I achieve focus, as long as I keep at least one of these focus points on the moving bird, the camera will track it and try to keep it in focus.    Sometimes it's a little more difficult than it sounds.


#M4_05029 1/2000 @f5.0, iso 400, 300mm, distance = 83.4 ft.
Canon 1D Mark 4 & 300L f2.8 IS lens


I thought the leg kick in the photo above made it interesting.  He was probably changing direction, as they usually keep both legs pointed straight back as they glide through the air.   Below is the same bird just 7 seconds later as it flew past from right to left. 


#M4_05033 1/2000 @f5.0, iso 400, 300mm, distance = 58.3 ft
Canon 1D Mark 4 & 300L f2.8 IS lens


Some people photograph birds in flight by pointing the camera and firing off a burst of a half dozen or more shots.  While my camera is capable of shooting 10 frames per second, I prefer to track the bird and instead fire off 2 or 3 shots at most, at just the right time.  This results in a lot less work sorting through a bunch of extra photos.  Also, if I am using flash, it cannot recycle fast enough to fire on every shot in a burst, usually only flashing on every 3rd or 4th shot if I'm firing at 10 frames per second.  Sometimes I can get a good shot without the flash if light is perfect, but it's the exception.  So I see firing long bursts as usually just a waste of battery power and memory space. 

I sometimes fired bursts when shooting sports, because flash is not used and sometimes you miss the best shot in a series if you don't.  But it has not been as useful for me when photographing birds.  

#M4_05058  1/2500 @f5.0, iso 400, 300mm, distance =45.2 ft.
Canon 1D Mark 4 & 300L f2.8 IS lens


Here is one final shot with the sun lighting up the wings and hitting the bird's eye just right. The  flash did not fire on the photo below and this is the kind of exception I mentioned earlier, where you sometimes get a good shot of a 'flyer' without flash if the light is just right.  [NOTE: Click on any image in this post to see a larger view of the bird]


#M4_04949 1/2500 @f5.0, iso 400, 300mm, distance = 58.4 ft.
Canon 1D Mark 4 & 300L f2.8 IS lens


Saturday, April 21, 2012

Cumberland Island

Last Saturday I spent the day at Cumberland Island with some friends.  It was a fun day, and a good opportunity to explore the main points of interest on the island.  I had been wanting to visit Cumberland Island since last year, when I had to cancel a planned week long trip because it was about to happen at the same time I got sick and ended up spending extended time in the hospital.   

Transportation to the island is by ferry, and it leaves at 9am from the dock in St. Marys.  There are 2 return trips at 2:45pm and 4:45pm on Saturdays.  On weekdays there is only the 4:45 return.  The trip is about 45 minutes up the St. Marys River. [click any photo to enlarge]

#M4_02746 - The Beach at Cumberland Island


The island is an interesting place to see.  There are lots of old oak trees and most are covered with Spanish moss which remind me of moss covered trees scattered around the school I attended in Jacksonville as a child.

M4_02733 - Oak Tree in front of Carnegie Mansion

M4_02744 - Salt Marsh at low tide
Some items of interest in the island are the 24,000 square foot Carnegie Mansion, and the ruins of Dungeness castle, which was a 59 room Scottish castle built by Thomas Carnegie, although he died before it was completed.   Dungeness was named by Thomas' wife, Lucy, after another building on the island that had burned down some years earlier.  Dungeness was also destroyed by fire in 1959 and was vacant at the time.  Also on the island is the small chapel where John F. Kennedy, Jr. was married.

There are approximately 160 wild horses roaming freely on the island, and we saw lots of them during our day there, including several ponies.   The horses were the main attraction that I hoped to be able to photograph.

M4_02645 - Wild Horses


M4_02626 - Wild Horses


M4_02544 - Wild Horses


M4_02606 - Pony
 
M4_02607 - Pony with Mother


M4_02826 - White Pony
When we arrived at the Dungeness ruins, we walked behind the structure and saw a group of about a six or eight horses, including this white pony that was with his mother, nursing at the time.  I tried to get a few close up photos of him because he looked really cute.

We walked around completely around the Dungeness ruins and I took some photos from different angles.  I am only posting two of them below; one from the front and one from the back.  We did not approach the horses very closely and they didn't seem to mind us being there.

M4_02780 - Ruins of Dungeness Castle (front)
M4_02842 - Dungeness Ruins (back)
Shown below is the small chapel (First African Baptist Church) where John F. Kennedy Jr. was married.  It was built in 1937 to replace an earlier structure that was built in 1893.

M4_02769 - Chapel (JFK Jr was married here)
M4_02762 - Inside the Chapel
We were also able to take a tour of the Carnegie Mansion.  It is being restored by the National Park Service and most of the first and second floor is accessible to visitors.  The images below show some exterior views and some of the spaces inside that I felt were interesting.  An air conditioning system has been added during the restoration to allow visitors to tour the building in comfort.


M4_02669 - Carnegie Mansion


M4_02687 - Inside the Carnegie Mansion


M4_02688 - Inside the Carnegie Mansion
M4_02693 - Inside the Carnegie Mansion
M4_02712  - Inside the Carnegie Mansion
M4_02722  - Inside the Carnegie Mansion
Below is a photo of our gang having lunch under the oak trees next to the Carnegie Mansion.  If you plan to visit Cumberland Island, you'll need to pack yourself a lunch and bring a water bottle or two to get you through the day. 

There is no food service on the island unless you are staying at the Greyfield Inn. There are no stores or restaurants, and you must pack out your trash and take it back out with you.  Likewise, there are no paved roads or trails, and no way to bring a vehicle onto the island.  Virtually all travel is on foot or by bicycle (rentals available) unless you take a van tour of the island.  There are several camping sites on the island but only one has running water and bathroom facilities with cold showers.  

We took an all day van tour that got us to the points of interest that I've shown in the photos.  The dirt roads are very rough and full of holes, and we all felt like bobble head dolls by the end of the day.  But it was a fun time and very interesting.  Reservations are recommended for both the ferry and for island tours.  The National Park Service limits the number of visitors on the island to no more than 300 at a time.

M4_02736 - Lunch time